How To Crochet A Little Debbie Christmas Tree Amigurumi Cuddler Pillow. Our Christmas Tree Crochet Pattern Is Created With Beginners In Mind & Works Up Quickly!
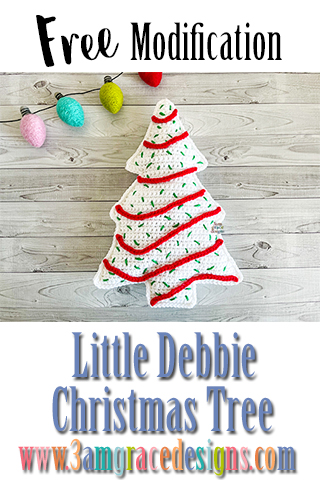
We’re excited to share our free Little Debbie Christmas Tree modification! Little Debbie Christmas Tree cakes are all the rage this year.
Here are some fun facts we found about the Little Debbie brand while researching for our free modification:
1. The first cakes – O.D. McKee began selling 5¢ cakes for Becker’s Bakery, using his 1928 Whippet as his delivery truck.
2. Little Debbie Strawberry Shortcake Rolls were originally sprinkled with sugar and called Jelly Rolls. They became Strawberry Shortcake Rolls in 1994, almost 30 years after they were introduced!
3. Little Debbie Christmas Tree Cakes are one of the most iconic snacks around. Do you remember their original triangular shape and chocolate trunk? Even though the classic scalloped tree shape wasn’t introduced until 2012, nothing says “Christmastime” quite like these festive treats!
For this modification, you will need the Christmas Tree Kawaii Cuddler® crochet pattern.
If you’ve never worked one of our Kawaii Cuddler® patterns, they are geared towards beginners. You will work two flat pieces and single crochet them together to finish the piece. Even if you’ve never been able to crochet from a pattern before, we’re confident you can create with a 3amgracedesigns pattern. We encourage you to join our Facebook Group where we remain active helping with questions! We love passing our love for the craft on to others!
Click HERE to purchase the Christmas Tree Kawaii Cuddler® crochet pattern
We hope you enjoy making your very own tall pumpkin with our crochet pattern! We can’t wait to see your creativity. When you complete one, please post it in our Facebook group or tag us on Instagram #3amgracedesigns. We love seeing your work!
Don’t forget to PIN this project to your Pinterest Boards!

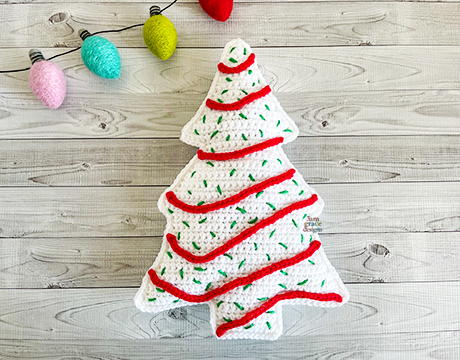
Little Debbie Christmas Tree Cake Modification
• Make Christmas Tree body with White yarn
Trunk
Row 1 – With White yarn, beginning in the 14th stitch of Row 53, SC11 (11) Leave remaining 13 stitches unworked
Rows 2-6 – SC across (11)
FO, Weave in ends.
Frosting Stripes
Make 1 of each with Red yarn.
Stripe 1 – Ch11
FO, Leave long tail for sewing.
Stripe 2 – Ch17
FO, Leave long tail for sewing.
Stripe 3 – Ch21
FO, Leave long tail for sewing.
Stripe 4 – Ch32
FO, Leave long tail for sewing.
Stripe 5 – Ch35
FO, Leave long tail for sewing.
Stripe 6 – Ch42
FO, Leave long tail for sewing.
Stripe 7 – Ch29
FO, Leave long tail for sewing.
• Sew or glue Stripes in desired location.
• Stitch sprinkles with Jellybean yarn as desired.