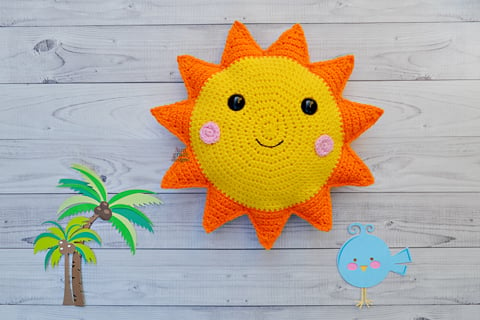
How To Crochet A Sunshine Amigurumi Kawaii Cuddler Pillow. Our Free Sunshine Crochet Pattern Is Perfect For A Pop Of Color In Your Spring Decorating!

Spring is on its way! We’re so excited to be part of the Dream Create Repeat Blog Hop! We’ve designed our free Sunshine crochet pattern Kawaii Cuddler® to celebrate.
He joins our Cloud Kawaii Cuddler® crochet pattern and Rainbow Kawaii Cuddler® crochet pattern.
This is a beginner level pattern. The techniques you will need to know are single crochet, single crochet increase, single crochet decrease, half double crochet, & half double crochet increase. Our finished project is 13″ in diameter using the recommended hook size. You are welcome to go up or down a hook size to create a different dimension. You can even hold two pieces of yarn together with a larger hook to create a giant cuddler. The sky is the limit!
If you’ve never worked one of our Kawaii Cuddler® patterns, they are geared towards beginners. You will work two flat pieces and single crochet them together to finish the piece. Even if you’ve never been able to crochet from a pattern before, we’re confident you can create with a 3amgracedesigns pattern. We encourage you to join our Facebook Group where we remain active helping with questions! We love passing our love for the craft on to others!
We hope you enjoy making your very own Sunshine with our crochet pattern! We can’t wait to see your creativity. When you complete one, please post it in our Facebook group or tag us on Instagram #3amgracedesigns. We love seeing your work!
Don’t forget to PIN this project to your Pinterest Boards!
CLICK HERE for the ad-free, printable PDF pattern
Materials
* Size H (5.0mm) Crochet Hook
* Hobby Lobby “I Love This Yarn” in Yellow & Pink
* Red Heart Super Saver in Pumpkin
* Two 24mm Black Safety Eyes (We’ve added them to Our Shop for your convenience)
* Poly-fil Stuffing
* Tapestry Needle
* Black puff paint or embroidery floss
* Craft glue or hot glue gun (optional)
Abbreviations
Ch – Chain
SC – Single Crochet
Dec – Single Crochet Decrease
HDC – Half Double Crochet
HDC Inc – Half Double Crochet Increase
FO – Fasten Off
MR – Magic Ring
Sl St – Slip Stitch
Dimensions/Gauge:
13” Diameter
*Note: Sunshine is worked in a continuous round. Do not join.
Sunshine
Make 2.
Round 1 – With Yellow yarn, MR, HDC11 (11)
Round 2 – HDC Inc x11 (22)
Round 3 – (HDC1, HDC Inc) (33)
Round 4 – (HDC2, HDC Inc) (44)
Round 5 – (HDC3, HDC Inc) (55)
Round 6 – (HDC4, HDC Inc) (66)
Round 7 – (HDC5, HDC Inc) (77)
Round 8 – HDC around (77)
Round 9 – (HDC6, HDC Inc) (88)
Round 10 – HDC around (88)
Round 11 – (HDC7, HDC Inc) (99)
Round 12 – HDC around (99)
FO, Weave in ends.
Sunshine Points
Make 11.
{Ch1 and turn at the end of each row}
Row 1 – With Pumpkin yarn, beginning in any stitch of Sunshine, SC9 (9)
Row 2 – SC across (9)
Row 3 – Dec, SC5, Dec (7)
Row 4 – SC across (7)
Row 5 – Dec, SC3, Dec (5)
Row 6 – SC across (5)
Row 7 – Dec, SC, Dec (3)
Row 8 – SC across (3)
Row 9 – SC, Dec (2)
Row 10 – Dec (1)
FO, Weave in ends.
Sunshine Points are worked around Sun without skipped stitches between points.
Cheeks
Make 2.
{Cheeks are worked in a continuous round, do not join}
Round 1 – With Pink yarn, MR, SC6 (6)
Round 2 – Inc x6 (12)
FO, Leave long tail for sewing.
Alternative to Safety Eyes
Make 2.
{Eyes are worked in a continuous round, do not join}
Round 1 – With Black yarn, MR, SC6 (6)
Round 2 – Inc x6 (12)
FO, Leave long tail for sewing.
Assembly
* Place safety eyes between Rounds 6 & 7, roughly 18 stitches apart.
* Sew or glue Cheeks in desired location.
* Use black puff paint or embroidery floss to create desired mouth.
Align Sunshine halves so ends of rows match. SC around both pieces to join together. Stuff with Poly-fil prior to completing stitching. Make sure you work in a counter-clockwise direction so your stitches face forward.
All photos and text are copyright © 2020 – 3amgracedesigns. All rights reserved. Please do not sell or distribute this pattern in part or in whole. You are welcome to sell finished items you make from this pattern. A credit to “3amgracedesigns” as the designer is appreciated but not required. Thank you!
CLICK HERE for the ad-free, printable PDF pattern


