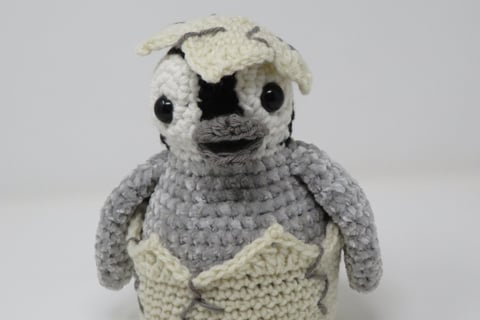
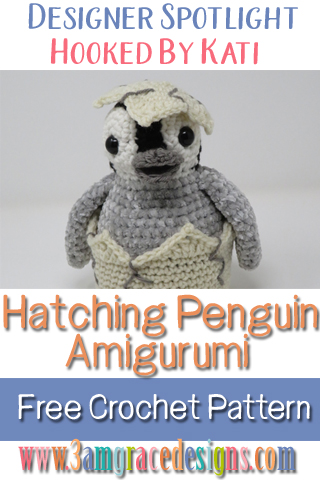
How To Crochet An Amigurumi Hatching Penguin Chick With Kati From Hooked By Kati. This Amigurumi Pattern Includes Instructions For His Adorable Egg Shell & Hat!
We’re thrilled to share this week’s Designer Spotlight crochet designer with you! Kati from Hooked By Kati has created this adorable Hatching Penguin Chick for you!
Kati Brown is a designer living in Colorado with her husband and two sons. She works in bright colors and fun shapes, and she loves making anything with safety eyes. Her blog, Hooked by Kati, is home to many bold amigurumi patterns for all crochet artists, from beginners to those in search of a challenge. Kati is also a regular contributor to several print magazines and was recently shortlisted by Lovecrafts.com for the 2019 Blog Personality of the Year. Through crochet, she hopes to inspire other artists to express themselves through crochet.
Be sure to go support Kati on her social media and thank her for sharing her precious pattern in our Designer Spotlight feature!
Blog
Pinterest
Ravelry
Etsy
Instagram
Facebook

CLICK HERE for the ad-free, printable PDF pattern on Etsy
CLICK HERE for the ad-free, printable PDF pattern on Ravelry
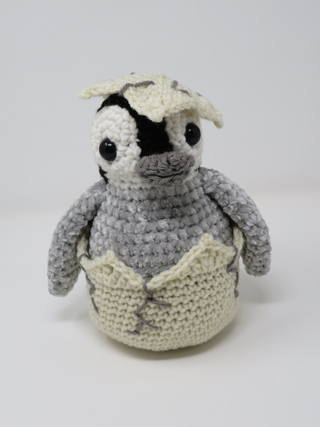
Hatching Penguin Chick
Pattern is written in English, in US terms using Craft Yarn Council abbreviations.
Easy. Knowledge needed of chains (ch), single crochet (sc), half double crochet (hdc), double crochet (dc), treble crochet (tr), increases and decreases. Knowledge of amigurumi part attachment is recommended.
Supplies
- Red Heart Super Saver yarn, 100% acrylic, worsted weight, 364 yds/7 oz/198 g, Black (BLK), < 1 ball; White (WHT), < 1 ball; Charcoal (CHAR), < 1 ball; Off White (OFF), < 1 ball.
- Bernat Velvet yarn, 100% acrylic, bulky weight, 315 yds/10.5 oz/300 g, Misty Gray (VEL), < 1 ball.
- G (4.00 mm) hook
- Two 15mm black safety eyes
- Polyfil stuffing
- Tapestry needle
- Straight pins (optional)
Measurements
8” tall x 6” wide
Gauge
7 sts x 9 rows in sc (worsted weight) = 2” x 2”
6 sts x 7 rows in sc (bulky weight) = 2” x 2”
Pattern Notes
- Work in continuous rounds. Do not slip stitch unless otherwise specified by the pattern.
- For best results, assemble parts in order as directed.
- Weave in attachment end at very end of project in case pieces require repositioning.
Instructions
Head/Body
With BLK, ch 2.
Rnd 1: 6 sc in second ch from hook. (6)
Rnd 2: Inc in each st around. (12)
Rnd 3: [Sc, inc] 6 times. (18)
Rnd 4: [2 sc, inc] 6 times. (24)
Rnd 5: [3 sc, inc] 6 times. (30)
Rnds 6-10: Sc evenly around.
Rnd 11: Change to WHT, 12 sc, change to BLK, 18 sc. (30)
Rnd 12: Change to WHT, [3 sc, dec] twice, 2 sc, change to BLK, sc, dec, [3 sc, dec] 3 times. (24)
Rnd 13: Change to WHT, 10 sc, change to BLK, 14 sc.
Rnd 14: Change to VEL, [3 sc, inc] 6 times. (30)
Rnd 15: Sc evenly around.
Rnd 16: [4 sc, inc] 6 times. (36)
Rnd 17: Sc evenly around.
Rnd 18: [5 sc, inc] 6 times. (42)
Rnd 19-28: Sc evenly around.
Stuff head.
Rnd 29: [5 sc, dec] 6 times. (36)
Rnd 30: [4 sc, dec] 6 times. (30)
Rnd 31: [3 sc, dec] 6 times. (24)
Rnd 32: [2 sc, dec] 6 times. (18)
Stuff body.
Rnd 33: [Sc, dec] 6 times. (12)
Rnd 34: Dec 6 times. (6)
Cut yarn. Thread needle through front loops of remaining 6 stitches. Pull tight to close. Leave long tail for sewing.
Wings
(Make 2)
With VEL, ch 2.
Rnd 1: 6 sc in second ch from hook. (6)
Rnd 2: [2 sc, inc] twice. (8)
Rnd 3: [3 sc, inc] twice. (10)
Rnd 4: [4 sc, inc] twice. (12)
Rnd 5: [5 sc, inc] twice. (14)
Rnd 6: [6 sc, inc] twice. (16)
Rnds 7-10: Sc evenly around.
Rnd 11: [2 sc, dec] 4 times. (12)
Rnd 12: Sc evenly around.
Rnd 13: [4 sc, dec] twice. (10)
Rnd 14: Sc evenly around.
Bind off leaving long tail for sewing. Flatten.
Sewing through both layers of last round, sew wings to sides of body at rnd 14, the front of each wing even with the edge of the white section on either side.
Eye Circles
(make 2)
With WHT, ch 2.
Rnd 1: 6 sc in second ch from hook. (6)
Rnd 2: Inc in each st around. (12)
Rnd 3: [Sc, inc] 6 times. (18)
Bind of leaving long tail for sewing.
Insert safety eye into any stitch between rnds 1 and 2. Attach washer to back.
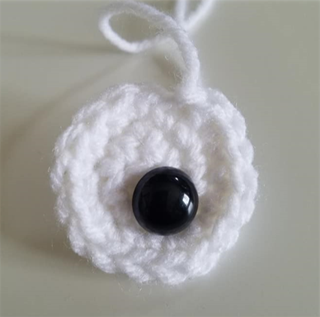
Using long tail, sew eye circles to head with outside edges in line with outside edge of white section on head. Align so safety eye is at the lowest side of the circle. Leave 4 sts between each eye circle.
Beak
With CHAR, ch 2.
Rnd 1: 6 sc in second ch from hook. (6)
Rnd 2: Inc in each st around. (12)
Rnd 3: [hdc, dc, 2 tr in next st, dc, hdc, sc] twice. (12)
Bind off, leaving long tail for sewing.
On a flat surface, with WS facing up, bend up tr ends of beak so it forms a cup shape. Fold in half with cupped edges together.
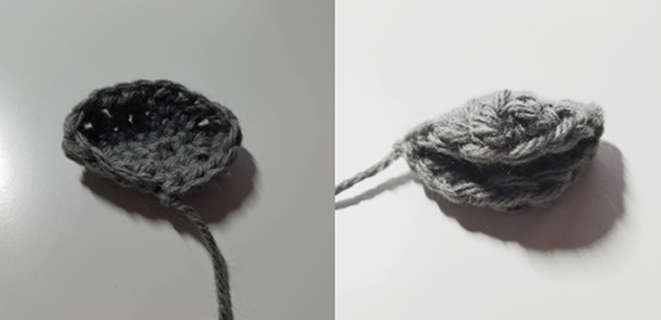
Sewing along fold, attach beak to rnd 11 of head, between eye circles, along edge of white section.
Cracked Egg
With OFF, ch 2.
Rnd 1: 8 sc in second ch from hook. (8)
Rnd 2: Inc in each st around. (16)
Rnd 3: [Sc, inc] 8 times. (24)
Rnd 4: [2 sc, inc] 8 times. (32)
Rnd 5: [3 sc, inc] 8 times. (40)
Rnd 6: [4 sc, inc] 8 times. (48)
Rnd 7-15: Sc evenly around.
Rnd 16: [3 sc, hdc, dc, (tr, ch 1, tr) in next st, dc, hdc] 6 times. (6 points)
Bind off and weave in ends.
With CHAR, sew cracks starting in the “valleys” between the points and randomly zig zag down the sides. The more random the better!
Egg Shell Hat
With OFF, ch 2.
Rnd 1: 6 sc in second ch from hook. (6)
Rnd 2: Inc in each st around. (12)
Rnd 3: [Sc, inc] 6 times. (18)
Rnd 4: [2 sc, inc] 6 times. (24)
Rnd 5: [3 sc, inc] 6 times. (30)
Rnd 6: [Sc, hdc, dc, (tr, ch 1, tr) in next st, dc, hdc] 5 times. (5 points)
Bind off and weave in ends.
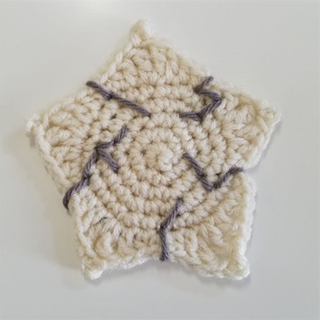
With CHAR, sew cracks starting in the “valleys” between the points and randomly zig zag down the sides. The more random the better!
Weave in all attachment ends when parts are positioned as desired.
Set shell hat on penguin’s head, slightly tilted to one side. You can choose to stitch the hat to the penguin’s head.
Stuff the penguin inside the Cracked Shell, wing sticking out.
OMG this is so cute! Thank you for sharing!!!
Adorable